Thursday, December 22, 2011

Swapping out & Upgrading the TV to HDTV

My neighbor David (who has been mentioned here before) and I frequently discussed our frustration with the stock TV’s installed in our Outlaws.  In the spring of 2010 we both concluded that we could and would find and upgrade the main wall mounted 26” TV, and over entry door 19”, TV’s with flat panel HD’s to improve the quality.  So, this modification is specific to both a 2008 & 2009 Damon Outlaw 3612 model motor home.

Our criteria was a) HDMI capable Flat panel with low profile (no more than 2 inches) b) maximum width of 36” for the main wall / 32” for the over entry door and c) comparable with a wall mount system.

Our search led us to the LG series.  Because these HD TV’s seem to change so much I won’t bother with the model numbers.  We also obtained two different types of mounts from our local electronic store (Altech) in San Antonio.  For the wall, it is a wall mounted, flat back, with a swivel and 18” extension arm.  For the doorway, the bracket is a simple flat back, swivel arm with a 12” extension.

As an aside, 2 days after both of our installs were complete, the LG Surround Sound Bar came on sale at our local Best Buy and both of us purchased and added them to the wall mount TV in this modification. They were not part of the original planning.

If you want the specifics on any of these parts, drop me a note and I will happily reply.

====================================

The following discusses the main wall (stock) TV replacement only.  The entry door replacement will be described separately.

The main wall stock TV is enclosed in a recessed wall space surrounded by a wood trim piece held in place by four (4) screws.  The TV was mounted on a flat metal. side mounted “H” frame, held in place by 24 screws (12 along the top and bottom).  Frankly, removing the original TV was the most difficult part of the dismantling process as the TV was not on any kind of a swivel or extension arm and we had to use long handle drives to remove the mounting screws.  The combined weight of the two pieces was about 30 pounds – far higher than either of us expected; so be cautious.    The stock frame was discarded and the TV saved for future use as an outside TV.         Life is tuff eh?

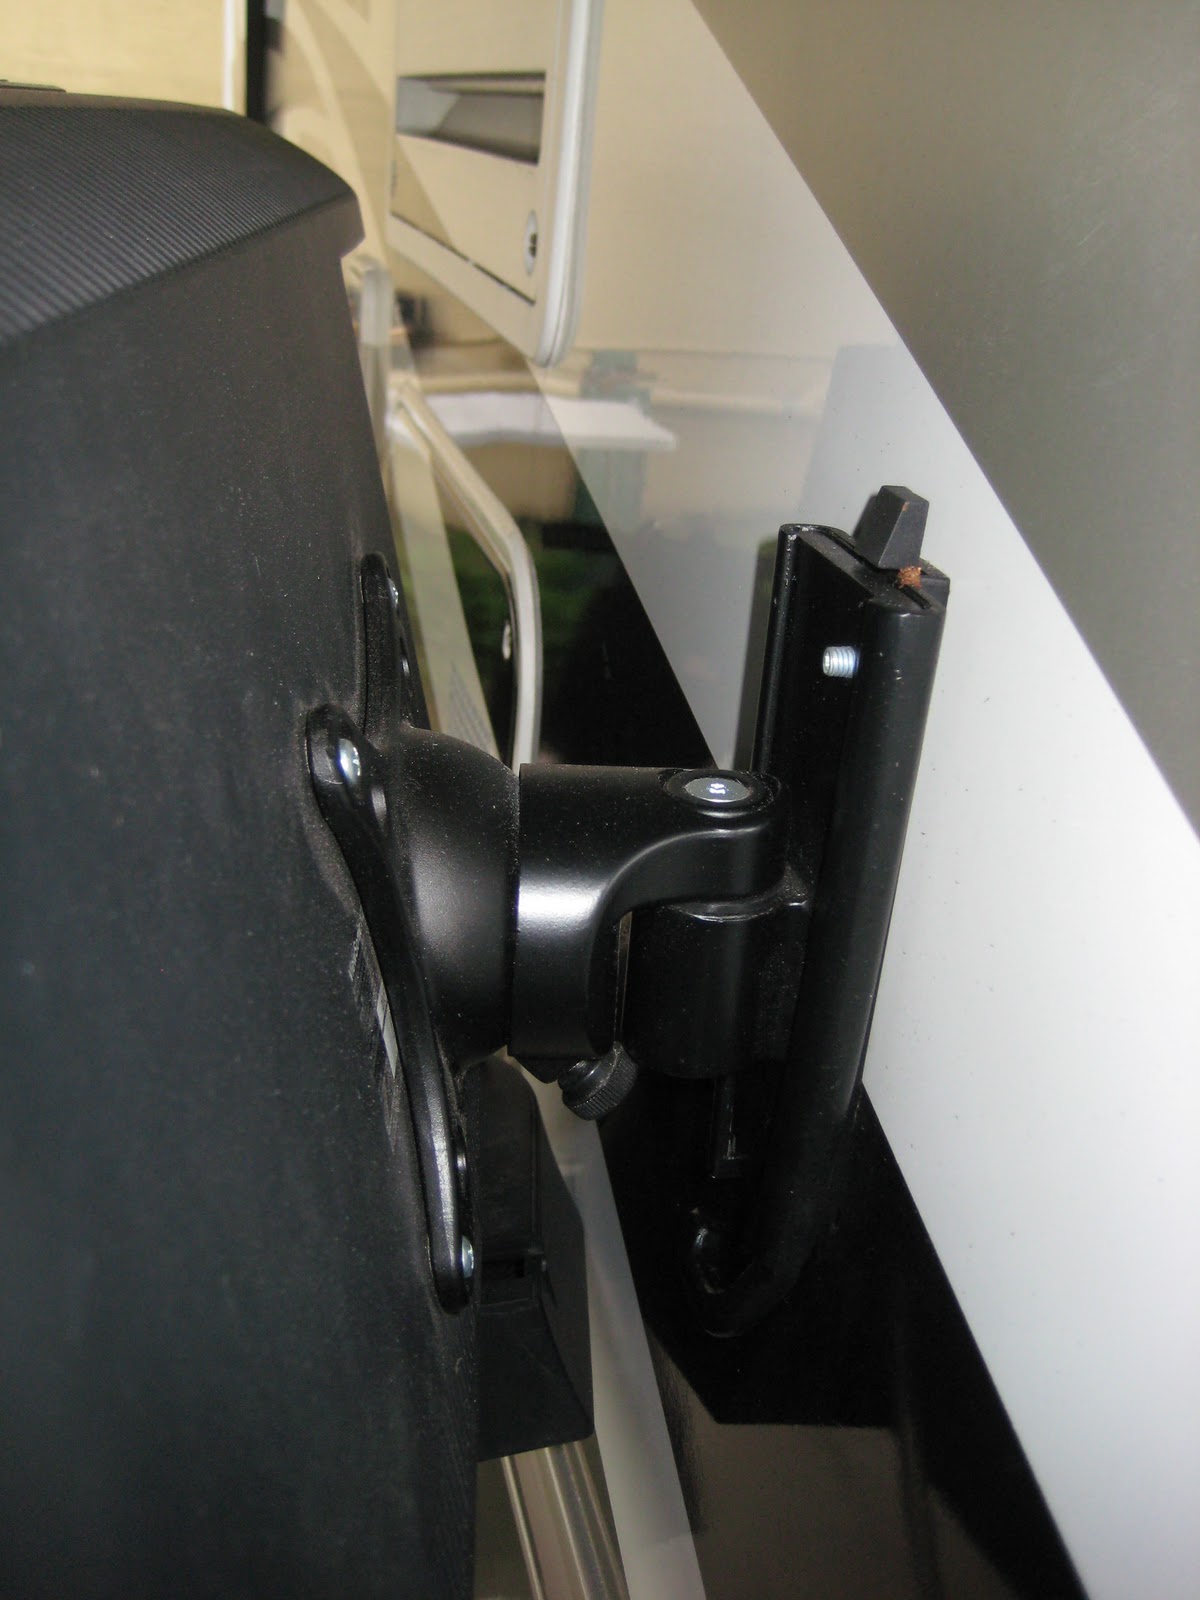
(*) The photo depicts the stock wall trim & clearance with the slide in the closed position.

Once the TV and mount were removed, the area behind the TV was cleaned up (dusted!); the cables were identified (Expect loads of AV, cable, and power cables) and organized.  The next step was to prep and tape off an area 10” wide from the right edge of the recess of the cabinet wall for black paint.  The purpose here was to provide an illusion that the recess actually extended further to the right then the original when the (new) TV was extended from the wall at a viewing angle.


Damon confirmed that the recess area is constructed of 2 x 4” framing with a ¾” plywood backing, with an additional dead space of 2-2 ½ “ between the rear framing and the interior wall for the bathroom.

The new wall mount was measured and mounted with sixteen (16)  SS screw (1/4 “ x 5/8” ) bolts into the stock plywood backing in the recessed area.  Take note that the mount “may not” (and definitely was not in our case) be the center of the cabinet, rather the center of the TV in relation to the center of the wall measured from edge to edge (in other words measure from the wall edge nearest the hall to the edge of the interior wall near the slide).  As you’ll note in the photo, my bracket is closer to the top right edge than the center of the recess – yours may vary.


I then mounted a power strip along the inside edge of the interior area to power the TV, the sound bar (more on this later), and an anticipated PC printer added in a later modification.  The power strip is powered from a standard electrical connection already located in the recess. A battery operated light strip was also placed along the inside edge of the recess to provide some addition light in this low-light environment when necessary.


After installing the mount, the original cables were run through the channels of the mount and the TV was mounted to the extension arm.


To secure the TV during travel (you don’t want it to swing out and hit the slide during travel, right?), I installed two “J” shaped hooks, one on the top and bottom, of the recessed area.  Painted black they blend into the background and a simple piece of cloth (or a bungee cord) is used to wrap from the hooks, across the front of the TV prior to travel, to hold it in place.
(*) The "J" Hooks are located in the center top and bottom of this photo 1/4" from the leading edge of the recess frame.


That completed the installation.


=========================================

SOUND BAR addition.

As I mentioned above, 2 days after completing the change out, the LG Sound Bar option came on sale at our local Best Buy.  After looking at them, and listening to an in store demonstration, I was sold on the idea that it was worth the cost to have a surround sound system option for the main TV.

The sound bar is mounted with two screw-in type brackets and can be located along the underside edge at the bottom of the wall recess.  The bar is mounted by slipping the power bar over and into the brackets.  The power cable, and associated power bar to TV cable can be run to the power strip and TV with no impact on the range of motion for the TV.  The accompanying sub-woofer is wireless and was placed behind the passenger side seat towards the front of the motor home.


The black cable on the left of the photo was later routed out-of-sight, and the gray cable shown in the photo is a Blu Ray cable from a later installation / addition of a printer, removable table, and Blu Ray player located under the TV area.  (Yet another modification to be posted later).

I hope this helps you if you decide to upgrade your own stock TV to HDMI, and please let me know if I can answer any additional questions.

Sunday, December 18, 2011

Winter Plumbing

Although I make it a point not to live anywhere above the Mason-Dixon line (I don't mind visiting my northern friends, I just don't want to live up there with y'all), it's a fact that our winters in Texas still get down right chilly on more then a few days during winter.  After experiencing a slightly frozen water pipe during my first taste of winter in the Hula Hut, I knew I'd have to be much more careful and take some necessary steps not to repeat that little act.

Turning to my neighbor I sought some much needed advice.  His solution has become my solution, and so I am sharing it here.  After two (and half) winters living in the HH I have never had a concern or a problem, even when our winter got down into the 20's for days on end last year.

The summer has never been a problem - I use 6' SS washing machine hoses (I carry spares for when the H2O line is farther away than expected) as water lines, fed into a standard water canister/filter and into the bus.  Nothing fancy, and pretty much what I see others using. I'm using quick disconnect couplers wherever I can.


In winter, I change the filter out to a standard in-line style filter, and rather than have to build a mount for it, find that putting it on the wheel gives it some protection from the elements.


You may have noticed the tie wrap and the black electrical looking line?  Let me explain...

When I switch over to this winter setup, it consist of a couple parts.  Primarily I use my standard SS lines, run the length of them with a heat strip (I found it a Tractor Supply), and wrap it with 1 3/4 inch pipe insulation.  For corners and turns in the line I use corner insulation - all of which can be found at the home stores.

Close up of the heat strip before being covered by the insulation.


These are the individual parts before tie wrapping everything into place.


This set up has worked for me in weather down to 18 degrees last winter.  I plug the heat strip into an in-line fuse, weather proof, extension cord and run it under the bus to my outside electric box.  The heat strip has a built in sensor that keeps it at a constant temperature above freezing.

So, that's it.  It works for me and I hope by sharing it gives you ideas that may work for you.

Roof Climbing?

One of the annoying things about the Damon Outlaw is the lack of a ladder for roof access.  Many of us hate adding items to add to our overall weight, but we know that getting on the roof is a pretty routine thing.  It's a PITA, but alas, what to do?

Through trail and error it seems the best place to access the roof is on the drivers side near the slide.  It's on the lower slope of the roof, provides some safety by giving you something to slide (fall?) against if the ladder slipes to the side, and last provides a hand hold if necessary.  The hardest part is always that transition from the ladder to the roof part - where there are no handy hand holds for you to grab onto and make it to the roof during that final stage.


Another Outlaw owner and I talked about this frequently, than one day at CW we came across entry door handles on sale....hmmmmmmm, wouldn't those be handy on the roof?   And so the solution presented itself.

I mounted two (2) of those handles on the roof with 1 1/2 inch SS screws and sealed them with silicone caps in the screw holes, and along the handle / roof contact point with a bead of silicome.


Now, once at the top of the ladder, I have a handy hand hold to make that final transition.  They are barely noticable from the ground, create no wind noise during travel, and have proven there worth.

It's just my simple solution.

Flags? Yes, everyone needs a Flag.

When I lived in Texas I had an elderly neighbor with a 5th Wheel.  Every morning he would rise early (well before sunrise) and each and every morning (weather permitting) he would raise a US and Texas flag.  In our little camp community we knew by those flags if he was home, off traveling without the 5W, or was under the weather.  It was like an alert system.  It also became a good way for us to tell visitors they were in the right place if they were greeted with the sight of those flags.

He moved away for several months during a trip and that got me to thinking that those flags, in addition to being the patriotic thing to do, really came in handy.  So I decided to mount two on the HH and take over those duties until he returned.

I obtained the mounting hardware from one of the home supply stores and the flags from a flag store in San Antonio.  The only oddity I came up with was the subject of poles.  I simply could not find a wooden pole or standard pole that worked with my application.  The solution suggested by another neighbor was to use an extendable pole used for painting.  Wow, that works.  I bought two (2) 14' extendable poles with a diameter that matched the mounting hardware.

The mounting is approximately 6 inches behind the passenger and drivers side windows, mounted with 2 sided 3M tape, and than secured with SS 3/4 inch screws, and sealed with a bead of silicone.
To secure the top of the flag pole, and provide some flexibility during wind, I made two "U" shaped brackets and mounted them in line with the top of the window frame.  I used the same mounting procedure as the bottom mount to hold them in place.  The bungee cord allows some "flex" for the poles to move during those pesky wind gushes.


You can see by the marks on the pole that the wind does make these move around alot.  But, the bungee cord seems to be the right solution.

To address the issue of flying the flag after sundown (yes, I'm aware of the limits of when and why this could be done - yet, I've often gotten home after sundown so this was an interim solution), I mounted those solar lights usually used for garden or driveway applications.  I mounted them by removing the end cap on the poles, removing the stake from the light, and using a small compression clamp to hold it in place.


Now, I have the opportunity to fly the flags wherever I go.  They not only function well, but they make for a handy landmark when you have someone trying to find you in a new park.


Saturday, December 17, 2011

Outside Removable Table

I use the outside of my rig darn near as much as the inside most of the time.  After installing the mandatory portable BBQ grill (after I got over the whole "it's not manly to use propane and claim to be a Texan" thing) I quickly realised that I needed more counter space to use.  Where do we keep all this stuff?

So, I looked around and sure nuff' THULE has a variety of tables for RV use.  Imagine that.  So, my criteria became; a) something that would not take up more then 3-4 inches of storage space along the wall of the Toy area, b) foldable if possible, and c) allow enough counter space to be worthwhile.

I think I found it.

They have a table that mounts on their module system using mounting brackets.


The brackets were easy enough to install, but measuring when you're unsure of where the inside support beams are at was a bit of a gamble.  It all worked out though...  After installation, and while traveling, you just replace the covers to conceal the brackets.

Without the covers....


Attachment points for the table look like this:

The table has worked out fine, and it folds away in the middle and into a nice package that goes against the inside wall of the toy area...with plenty of room left over for the bike.  BTW - that grill in the picture is just a loaner....I have a real man size grill like I am supppose to have!

Shower Modification

I admit I'm a tad bit taller then the average at 73 inches (6'1"), so I had a little trouble with the whole "hits me in the chest" stock shower in my Outlaw.  Obviously I needed to do a little mod to this oversight by the dwarf engineers at Damon.

It was a simple modification, buy the pvc and other supplies at the Home store of your choice, buy the jim-dandy shower head, and bam, you're done.   Whole modification took about 35 minutes and the cost was minimal.    But now, I have a shower that hits me in the face when I want it.   :-))

So, I went from this. . .


To this...


Fans Fans Fans

OK, I admit it.  Texas summers can be brutally hot.  During the past two years we've had temp's well over 105 degrees for weeks at a time.  Although I love my Outlaw, they certainly were not designed to overcome those temp extremes with the stock A/C units on the roof. At least not if you're parked on concrete pads and there are no shade trees within 100 feet of you.

After visiting my neighbor David (owner of a 2008 Outlaw) and seeing his solution to this issue, I have bluntly stolen his idea as my own on this forum.   I'll buy him a beer or something later.

Vornado has small folding fans which work well in this application.  They take up little room, are (somewhat) inexpensive, and easy to install.  They circulate the air much better then the stock set up and keep the inside temps comfortable.  Do they have any impact on how hard the AC's work?  Who knows, I'm no engineer.  But they seem to work and that's good enough for me.

I started off with two of them, which has grown to four.  One mounted under the cabinet on the passenger side behind the passenger seat, two mounted on either end of the cabinet over the sofa and dinette, and one just outside the loft sleeping area. IMHO Combined with the Termal Curtains I installed (see earlier posting) they disapate alot of the heat.

Yes, I recommend them.


Doorbell? Let me explain. . .

I don't travel out of town on Military TDY or business nearly as much as I did before I retired, yet when I am home, there are times when I'm just busy doing something else when someone would come knocking on my door.  More then half the time I just didn't hear their timid knocks and I would be answering that whole "why did you ignore me?" question later in the day.

I decided to resolve that little issue with a brilliant plan.  I would add a door bell to the Hula Hut, but after a short period I had to add proper signage to help people "get a clue!"

I obtained a battery powered door bell from one of the local home stores and mounted the buzzer next to the handle of the entry way.  You would think that would be the logical place, right?  But, no, some people just don't see it...hence the sign which was added later.


The door bell itself was placed on the shelf over the closet so that it could be heard throughout the rig (and yes, that's my emergency "thaw out" bottle next to it in the photo - it gets damn cold in Texas wintertime).


Now, why would anyone need a sign about a doorbell?  Let me explain.  Some of the people who come visit don't always have the best vision, or perhaps they're just not looking for a doorbell on a Motor Home.  Then again, there's always the UPS or FEDEX guys, and then the neighbors who just choose to ignore it.  Apparently given my sense of humor they can get away with it.

At any rate, after 2 weeks of people still knocking on my door I asked the local sign shop to make me up the following.  They got such a laugh out of it they didn't charge me, just asked if they could hang a copy on their wall; where it now hangs as an example to others.

Funny, more people actually use the door bell now.

Little Things - Part 2

During an 18 month period of living as a full timer, I was surprised at how many little things I've added to the HH.  Here's part two of the ever expanding list.

Solar Vent fan:

Easy as pie.  I removed the stock vent cap, installed this one per instructions and checked it off my list.


Weather Station.  I discovered early on that knowing what is brewing outside has a direct impact on my comfort inside.  Gee, imagine that.  With the wild fluctuations in Texas weather, it did not take much convincing from my neighbor David for me to add a weather station to the HH.

I actually added two of these over time.  One monitors the temp in the water closet during winter through the remote sensor, and the other just the outside conditions though a sensor under the chassis frame.  One of the control heads is mounted over the entry door, the other in the loft sleeping area.  That way if the alarm goes off for temperature extremes in the middle of the night I can leap (hardly) out of bed and handle it.

Driveway Sensor - intruder alert?

Some of the places I've stayed have a lot of kids (OK, some adults) just wandering around or through the camp sites.  This can be annoying as hell if they're part-timers you don't know (no offense to the part timers), and on more then one occasion I've actually had a few items grow legs and walk away from my campsite.   This was one solution that worked for several of us at a site in Texas.

The drive way sensor was from Harbor Freight and the cost was around 25 bucks.  The sensor is located on the frame on the passenger side (wheel well) strut, and pointed towards the patio area.

The control head was mounted on the wall, on the inside hallway by the control panel.  The alert tone has two settings, lo and high, and lo has been more then enough to alert me when someone passes though.

Outside TV Change

I have another post that has yet to be put up here about changing out the inside stock TV's to HD flat screens.  So this is out of order in the grand scheme of things.   Is anyone keeping track?

The Outlaw is designed (and comes stock) with four (4) TV's.  One on the living area wall, one over the entry door, one in the sleeping loft, and one in the Toy Box area.  The one in the Toy Box is designed to be removed and used outside when wanted.  It's a small screen (13 inch), lightweight, stock TV designed to slip into a channel / grove type of mounting bracket under the 1st compartment on the passenger side next to the entry door.  You put the compartment door in the "up" position and there are an electrical and cable plug for the TV.


After I upgraded two of the inside units I had an "extra" 27 inch TV that I elected not to get rid of.  My thought was to use it outside (influenced no doubt by the experience of trying to watch the Superbowl last year on a 13 inch TV?).

I removed the stock mounting bracket from inside the compartment door.


That was the easy part.


I obtained through one of our local outlet stores a wall mount bracket designed for flat surfaces and a working load of about 50 pounds (I wanted to over engineer it - why take a risk, eh?).  I pulled the drawers and dividers from under the inside sink area to access the interior of the outside wall to check for obstructions, then measuring from the outside, drilled two mounting holes for the TV mount.  I secured it with 2 sided 3M tape, then 2 SS screws and bolts, and finished it with a bead of clear silicone.


The mount comes standard with a ball swivel so that it can be rotated to whatever viewing position (within limits) you find comfortable.


I store the TV (inside a BBQ cover) inside the compartment when not in use.  But, it has been a good addition to the outside entertainment, is solid, and took only about 2 hours of labor.  I plan to tap into the outside audio system to run the TV audio through the stereo system, but that's for another time.

For now, this works just fine.